Contents:
- Best season for trekking
- How much does it cost?
- Permits
- Guides and porters
- Packing list
- What to buy in Kathmandu
- Lodges and tea houses
- How to get there
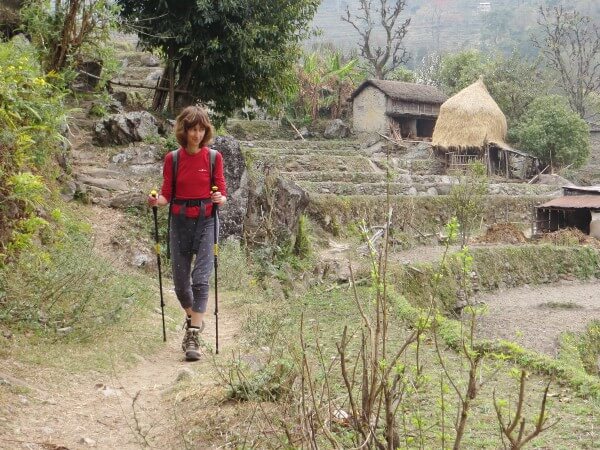
Trekking around Annapurna is one of the main reasons, why tourists come to Nepal. Unique long-distance trek through villages, with picturesque view of mountains runs for about 250 km and gives you an opportunity to live far away from civilization. However, a lot has change since this trek was first opened in 1970's. Trekking trails became the road for jeep, you could find wifi in some villages, gas shower with hot water and many other facilities. But nevertheless for many, this track is still a sort of challenge....
There are a lot of optimistic reports about trekking around Annapurna.
Maybe I am a sort of loser but my friend and I didn’t make a circuit around Annapurna, due to the heavy snowfalls. Even so, I want to share my experience with you that is why I write this guide. You can find our travel experience day by day here.
Best season
There are two high seasons for visiting the trek:
Spring - from March to May
Autumn - from September to November
Keep in mind that in spring clouds usually hide the mountains after 12 o'clock, but if you fond of flowers - this season is just for you as rhododendrons are in full blossom! In early spring it could be snow on the paths.
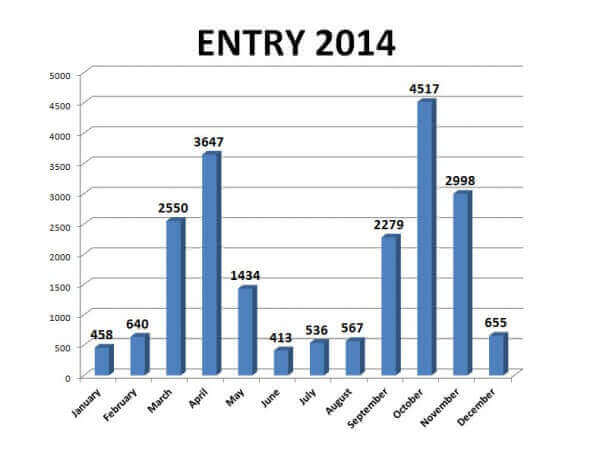
Autumn is perfect season in all respects, except for the fact that during this period there is the largest number of tourists here. Below you will find statistic from Nepal tourism office with number of entries of the trek during 2014 year per each month. It is clear that October is the most popular month.
We had trekking Annapurna circuit late February. There were a lot of snow and Thorung La pass was closed for at least 10 days…
How much does it cost?
We spent about 200$ for 10 days trekking for 2 person. We usually eat breakfast and dinner in guesthouses. For lunch we drank tea with some snacks that we brought with us.
The major expenses are:
- permits: 45$ per person
- food: in comparison with prices in Pokhara and Kathmandu food on trek is rather expensive. You can check detailed information about prices on food in the chapter Lodges and Tea houses. Breakfast and dinner will cost you about 300-600 Rupee per person without beer or wine of course.
- buses/jeeps: read more information in the chapter How to get there
- hotels: are cheap on the trek
Usually we paid 200 Rupee for double room. Sometimes it was even cheaper, several times owner ask us to eat in his restaurant and we lived for free. However, it was not high season and prices in menu for double rooms were from 300 - 500 Rupee.
Permits
Yes, you have to draw up the permits to visit any mountain in Nepal including Annapurna. There are two types of permit you will need to arrange before trekking.
- TIMS (Trekker’s Information Management System) card, which is believed to help in finding you in case you are lost or have some troubles in the mountains. On my own opinion, that is one more way to get the money from tourists. Anyway, you have to bring with you this card on any trek in Nepal.
Price for the card is 20$ for individual tourist and 10$ for organised groups.We register TIMS card in Kathmandu at the Nepal Tourism Board building (GPS coordinates: 27.701665, 85.317056) which is situated in a walking distance from Tamel. We reached this tourism center in 30 minutes. You need to bring with you 2 passport photos and money.
Then you will fill in the form with some details about your trekking intentions, and that’s it - you are a lucky holder of the TIMS card - it is issued on the spot.
You can read more information about TIMS on their official website.
- Next thing you will need is a permit for trekking in the area you are going to visit.
For trekking in Annapurna region you should draw up the appropriate permit, which costs 25$.
We draw up the permit in the same building Nepal Tourism Board. Again you should bring 2 passport photos - permit is also issued on spot.
Overall it took us around 2 hours to get two this documents (30 minutes walk from Tamel, than 30 minutes back, and around 1 hour for issuing permits).
However, there were no queues when we were there due to the low season, so probably be ready to spend more time.
Otherwise, if you are lazy to get these permits by yourself, every travel agency in Tamel will be glad to help you for not so much money.
If you are going to draw up these documents in Pokhara you should go to the Nepal Tourism Board as well. It is situated at the Damside, not far away from tourist bus stand (approximately GPS coords are 28.2000067,83.9695304)
Be ready to pay double price if you arrive for trekking without permits. All way long Annapurna circuit trek there are police checkposts.
Guide and porters
While trekking we met both many organized groups with guides and porters as well as individual travellers of any age. It is hard to give exact answer whether you need porter/guide or not. The most important thing you should know - neither guides nor porters are obligatory on the trek around Annapurna. It is up to you whether to go with guides or independently.
I consider that porters and guides are useless on this trek, as you don’t need to bring too much things with you. Of course sometimes guide can be useful. Good guides can share some experience with you. Usually they organize everything for you, so you don’t have to decide in what guesthouse you will stay, for example.
For me it is too boring when I don’t have chance to make my own decision. You shouldn't be afraid to lost during the trek as path is very obvious almost all the time. The one day that I was thankful to guides and porters was when we got stuck in one of the guesthouses in Humde because of the heavy snowfalls. All paths were covered with at least one meter of snow. There were no chance for two of us to continue the trek. My friend was trying to make the road just for fun in that huge layer of snow. He returned in half an hour and said that he had done only 200 meters of road and was fully exhausted. Snow reached his chest and he was swimming in the snow, not walking. In the evening organised group of 10 tourists with guides and porters came to our guesthouse. They told us they have been making the path all day long, they did a long way of 6 km for about 12 hours. Thanks to that guys we were able to continue our trek.
We had two backpacks - one with a weight of around 10kgs with warm clothes. Another one weighed around 7kgs with food stocks and 1 liter of water so there was no need in porter.
Usually, you will pay 7 -10$ for porters and 10-15$ for guide per day.
Packing list
Clothes you will need depend a lot on the season you are going to do the trek. In winter it is very cold, while in high season (april, may, october) it will be probably warm weather except high altitudes.
We did trek around Annapurna at the end of February, so I describe you my attitude to the clothes from the perspective on rather cold weather.
If it was not raining, it was warm during the day (around 15-20 degrees above zero). We wear one fleece or even just long-sleeve thermal underwear and fleece or light pants. But at the evening it became cold enough, especially after 2000m above sea level. Temperature fell down to 5-6 degrees. In Manang it was even 3 degrees below zero at night in our room.
Below is a list of clothes we wear:
1. trekking shoes
Of course, you know well that shoes might be comfortable and at least theoretically waterproofed. As for me, I don’t believe in waterproof boots. All shoes I had seen were wet if too much snow or rain, but the good one will keep your feet dry for the longer period of time and your feet won’t get cold if temperature is much more below zero
I have had a good new shoes, a little bit heavy one. I wear them for several days in Kathmandu before trekking. One problem was that it was too hot wearing them at the beginning of the trek. Another problem was their weight - they were really heavy ones.
So i think it is a good idea to begin trek in light shoes and bring more heavy boots for the snow days. As I read somewhere “One extra kilogram on the feet is equal to five extra on the back”. First days it was really hard for me to walk in that heavy boots. I think my pace was slower more than two times due to the shoes. But then I’ve got used to them somehow.
We saw many people made trek in snickers even at the end of February, but this is very bad idea for sure. I don’t know about the weather conditions in the high season, but it will be cold on Thorong la whenever you decide to trek.
2. trekking poles
Yeah, there are so many debates around trekking poles. Somebody loves them, somebody considers them useless. As for me I am that one who likes trekking poles a lot. I have had many hikes without poles, but when we bought ones I understand how much more easily and comfortable is hiking with poles. I feel more stable when with poles. When I lean on them I transfer the weight of a backpack from back and leg on hands, so I have less back pain. It is impossible to go quickly with a trekking poles and that’s good - because you won’t pant. You will just go slowly, in comfortable pace without pauses.
3. Waterproof and stopwind jacket and pants
It is really very good idea to have these clothes. On the big heights wind is severe. Snow and rain happen often in mountains. I had a jacket that appeared to get wet very quickly. One day we walked in rain and another one in snow and my fleece was absolutely wet under this jacket… It was very uncomfortable feeling. I would like I have carried my good raincoat with me for such weather. It was a real mistake not to bring raincoat.
4. Down jacket
It could be very cold on the upper altitudes, especially at the beginning of the season. So you will be definitely glad to find warm down jacket or at least sleeveless down jacket. Friend of mine had sleeveless down jacket and I usually sleep in it or wear it during the evenings when it got too cold even if it was warm during the day.
5. Several fleece pullovers
Fleece is a good choice. It is warm, relatively light and dry quickly. Both of us have had 2 fleece pullovers, one without zipper and one with zipper. You can easily combined them depending on the temperature. When it was too cold we wore both, during the day we wore only one.
6. Thermal Underwear
Both of us had one long-sleeve thermal underwear and thermal pants that we wore under our usual pants when it was cold. As for the pants we have had three pairs: underwear pants, fleece/light pants and waterproof pants. We combined them depending on weather conditions, it was very convenient.
7. Socks
I had 4 pairs of socks, one of them was special trekking one. I don’t believe in the magic of the trekking socks but I assume it is worth to buy at least one pair if you have money. They dry quicker, they feel much more better when wet, overall they feel more comfortable than normal one. Another two pairs I used when sleep and one pair was reserved.
8. Gloves
On the high altitudes it was cold enough so I wear fleece gloves. I had also a pair of stopwind and waterproof one - it was a good idea when it was snowing.
9. Sunglasses
You will need them for sure! We bought the cheapest one in Nepal, but they fit well and don’t have big gaps. We read a lot if cheap sunglasses are safe to wear, finally we decided that they are a good option. As a result I am satisfied with that sunglasses that we bought. It is essentially to wear sunglasses on the altitudes above 3000m
10. Snow gaiters
I am not sure you will need them but I was really upset that we didn’t bring our gaiters. It was too much snow and all the way it backfilled over the top of my boots.
Another useful things you should know about:
1. Sleeping bag
We had warm goose sleeping bags that we used on the altitude 2500m and upper. Usually, each guesthouse will provide you with a blanket or even two if you will dare to ask for additional one (in the high season I guess there is no addition blankets). On the low altitudes it was comfortable to sleep without bag, but then it became too cold (after 2000m).
2. Sunscreen
Bring it for sure! It is better to buy one with high spf (we had 50 spf). It is strongly recommended to use it from the 3000m altitude and higher, as sun becomes very active there. You may buy sunscreen in almost every store in Kathmandu or Pokhara, but they are overpriced there and usually they sold sunscreens made in India.
3. Towel
You will definitely want to have a shower during your trek so you need the towel, as there is no towels in the lodges. We bring our light-weight towel.
4. Toilet paper
It is hard to find this one in the guesthouses so my advice - bring toilet paper with you (you can also buy one in many stores during the trek, don’t worry)
5. Food
We brought 10 snickers, 10 packs of cookies, 50 teabags, 10 lemons and 1kg of sugar. Snickers and cookies are a good option to have a snack during the day. However, villages appear rather often on the trek so you might want to have a good lunch rather than to have a snack.
Bringing teabags was very wise decision as usually black tea in guesthouses was not strong enough (we ordered black tea several times when we ran out from lemons and teabags and all the time they served us light brown tasteless water). Using lemons we did hot lemon tea - it was perfect!
We also brought with us one big cup (400 ml) and small portable heater. When it was a socket in the room we boiled water by ourselves. Otherwise we asked for a hot water (be ready to pay for hot water as well) - it was much cheaper and tastier than drink black tea from menu.
6. Flashlight
Sometimes it could be the problem with light so it is a good idea to bring a flashlight. When we did trek it was a heavy snowfalls so there were no light in some villages we lived in for 3 days.
7. GPS navigator
You might want to buy map, but maps are rather expensive and not very informative (the most detailed I have seen was 1:50 000 for around Annapurna trek).
So as for me it is better to download vector maps from the internet and use the gps navigator. We used software Locus for androids and brought one smartphone with us.
What to buy in Kathmandu
There are plenty of shops around Tamel in Kathmandu and along lakeside in Pokhara that sell everything you might need for your trekking. Many people buy something from these shops.What all of these shops sell is fakes on popular brands like North Face, Marmot and others. And in fact all of these clothes are cheap, but of very poor quality.
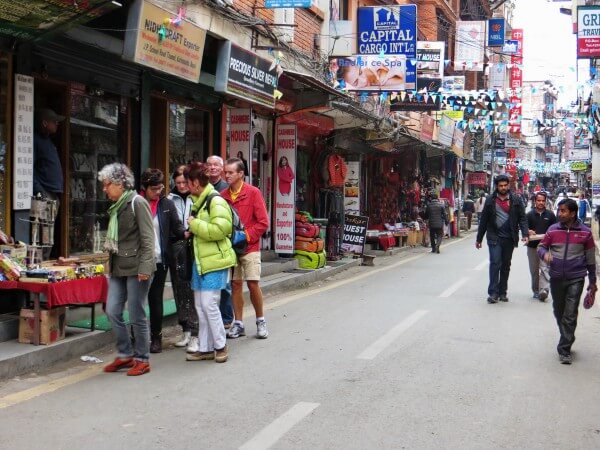
At first, it seems that there are plenty of clothes you can choose from, but when it comes to real purchase it appears that none of that things fits you for one reason or another. I intended to buy waterproof pants, but all of them were either short or too big. Finally we found not so bad option. Price was 2200 Rupee (~22$) but we bargained to 1800. Eventually, pants appeared to be rather good, they are really waterproof for the time being. Friend of mine bought similar pants, they were on sale and costs 1000 Rupee.
We also bought trekking poles, one new pair for 2000 Rupee and one used one for 1000 Rupee (there are also cheaper one for 1000 Rupee for new pair but we wanted poles with clicks).
What you could buy is fleece jackets - there are really plenty of them for different price, but who knows how soon zipper on that jacket will broke…..
So, as you might understand, I don’t advise you to buy something from that shops, unless you have no other opportunities.
We met one man during the trek who bought shoes for 8000 Rupee (rather expensive I consider for that quality). He was very unhappy with that one.
Also one girl told us about similar situation regarding backpack. She bought one from that shop and it has torn on the second day of the trek. She was really very upset (I could imagine how bad might be trekking with unhandy backpack).
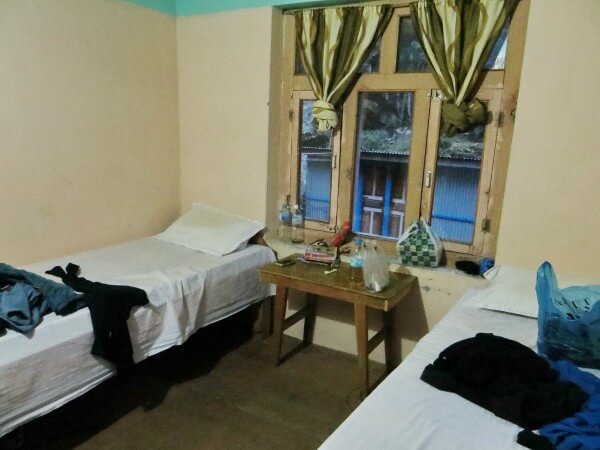
Lodges and tea houses on the trek
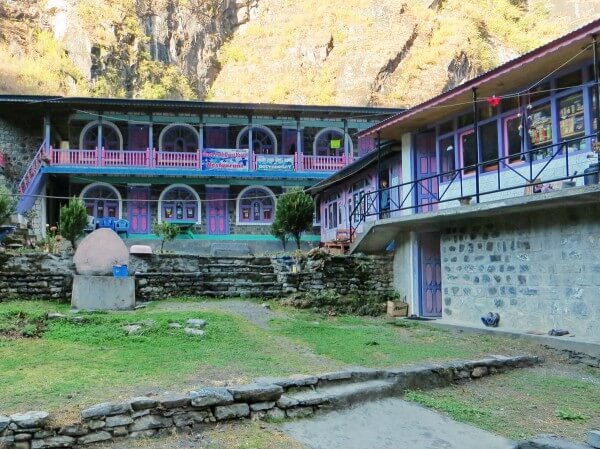
There are a lot of villages and in each you will be offered good food and very simple room. All rooms along the trek are very similar - two beds, sheets, pillows, blankets, small table, lamp - that’s all you will find in the room. Some rooms have sockets so you can charge you mobile phone or cook a tea as we did :) Prices for rooms are pretty small, we usually pay around 200 Rupee (2$) for the room, although price for this room in menu (yes, room fees are indicated in menu) was at least two times higher - maybe it was due to low season.
One time we even lived for free, owner just asked us to eat in his restaurant. Usually toilet and shower are common. In spite of many lodges promise you 24 hot shower, to meet real hot shower is a big luck (we had one not bad in Jagat). Some lodges use gas heater but due to the very cold water and saving mode of gas usage we had rather cool shower there.
Many guesthouses will offer you free wifi, except in Manang where it cost 200 Rupee per day. As you climb up you will face with a paid charge for your mobile phone (usually it was 100 Rupee for full charge)
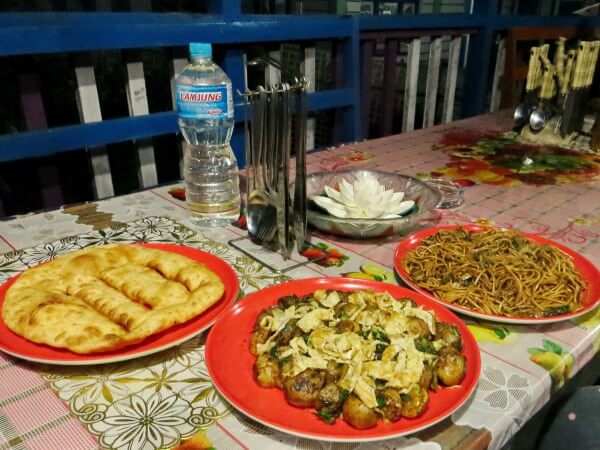
Every lodge has its own restaurant and here is where the most of income earns. Prices for the food are high enough, but portions are big and we usually ordered two plates of something and were very full. Menu is rather varied, you will find fried potato, noodles, macaroni, soup, pizza (not Italian one but rather tasty :), muesli, eggs, bread, pancakes, apple pie and of course dal bhat.
I have my own opinion on dal bhat though many people like it and order it. Dal bhat is a plain rice (bhat) with liquid soup of lentils (dal) plus something else (usually you will be given one papad - roasted thin bread, curry potato and stewed cabbage).
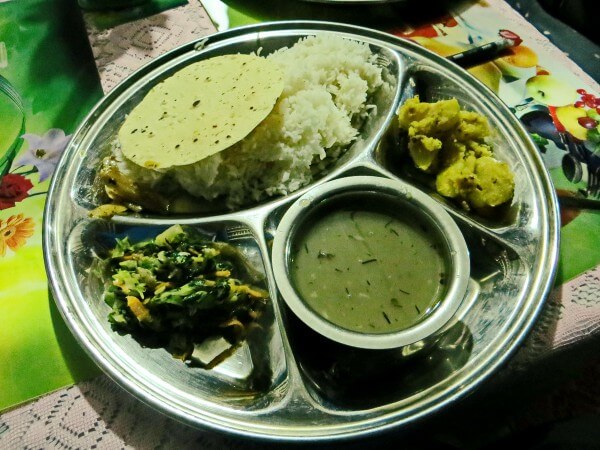
Dal bhat is like unlimited meal - you can ask for addition rice and dal until you will be full. Actually dal bhat is one of the most expensive meal in the menu and not so tasty as for me. It costs almost as much as another two meals which are much more tastier.
Usually we ordered fried potato and fried macaroni with vegetables or eggs and that was tasty. Also I advise you to try tibetan bread - I liked it very much.
Prices increase with the altitude, below is a table of some meals from menu in different villages (100 Baht = 1$). Prices are shown in Nepalese Rupee and are valid for 2015 year
Note: all hotels in each village have the same menu with similar prices.
| Meal | Bhul Bhule | Jagat | Chame | Pisang | Manang |
| Dal bhat | 300 | 350 | 425 | 450 | 500 |
| Fried potato with vegetables | 220 | 270 | 225 | 230 | 345 |
| Fried macaroni with vegetables | 220 | 270 | 275 | 280 | 375 |
| Tibetan bread | 150 | 200 | 225 | 250 | 250 |
| Muesli with hot milk | 150 | 170 | 200 | 240 | 300 |
| Pancake | 150 | 170 | 200 | 250 | 250 |
| Plain omelette | 130 | 170 | 200 | 200 | 250 |
| Mushroom pizza | 300 | 350 | 450 | 390 | 450 |
| Black tea | 30 | 35 | 35 | 40 | 50 |
| Hot water | 20 | 30 | 30 | 30 | 40 |
If you can’t live without meat there are meals with chicken or even with yak meat but be ready to pay much. Also there are some alcoholic drinks available along with beer. Bottle of beer 660 ml will cost you around 450-500 Rupee. However there is cheaper local beer which is called chang, It is served hot or cold and costs around 70-120 Rupee for a cup (we didn’t dare to try it).
How to get there
Either you come from Kathmandu or from Pokhara you will need the bus to Besisahar from where trek indeed begins.
From Kathmandu:
- you can use public bus from Gongabu bus park or Central bus terminal. This bus stand is situated rather far away from Tamel, the ride on taxi to it will cost ~150 Rupee. You should buy ticket the day before the trip, ticket costs 300 Rupee.The trip takes 7-9 hours
- you can buy ticket for the tourist bus which departure from not far away from Thamel, Price is higher, travel time is almost the same.
From Pokhara:
- you can get public bus from Prithvi chowk bus stand for 250 Rupee (there is no bus timetable there, some drivers said there is a bus around 7-8 am)
- or buy ticket for tourist bus for 400 Rupee which depart from tourist bus station in every travel agency along lakeside
It will take 4-5 hours to get to besisahar from pokhara
From Besisahar you can ride on jeep as far as to Chame (in high season probably you can get as far as to Manang). Ride to Chame will cost 2000 Rupee and 7-8 hours travel time. Another possibility is to ride to Jagat for 1000 Rupee and 4 hours of travel time.
We caught the bus to Bhulbhule for 200 Rupee and I strongly recommend you to ride at least to Bhulbhule because road from Besisahar to Bhulbhule is awful - it is very dusty and unpleasant and it is definitely worth a ride, as the feeling there is like you on a huge construction but not in the mountains.
You can buy a tickets for a jeep or for a bus in the ticket counter situated on the very north part of the city, after the TIMS checkpost. Ticket counter is not very obvious so look attentively, we pass it through several times.
I hope, now you are more or less know how to plan your trip around Annapurna. I wish you good luck and don't forget to like article!
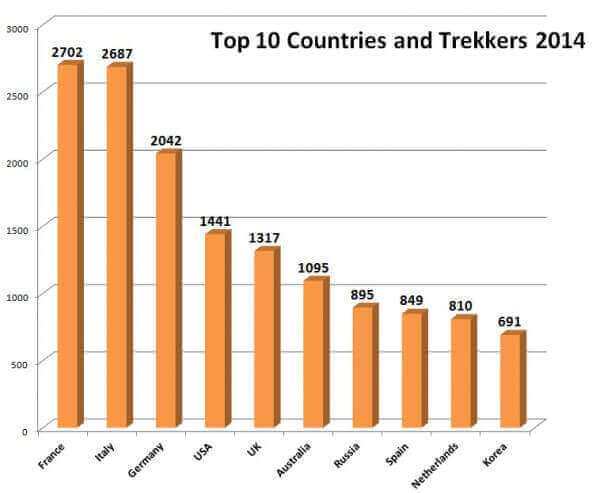
And some more statistics at the end. Diagram below shows top 10 countries that made Annapurna circuit trek, information is taken from Nepal Tourism Office.